
Perhaps shadowing is the most important part in digital scrapbooking.
If you want your digital pages to look like paper layouts, proper shadowing is the key.
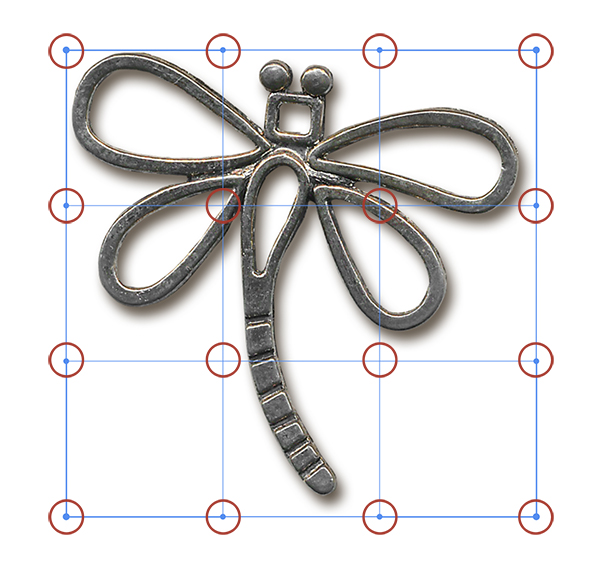
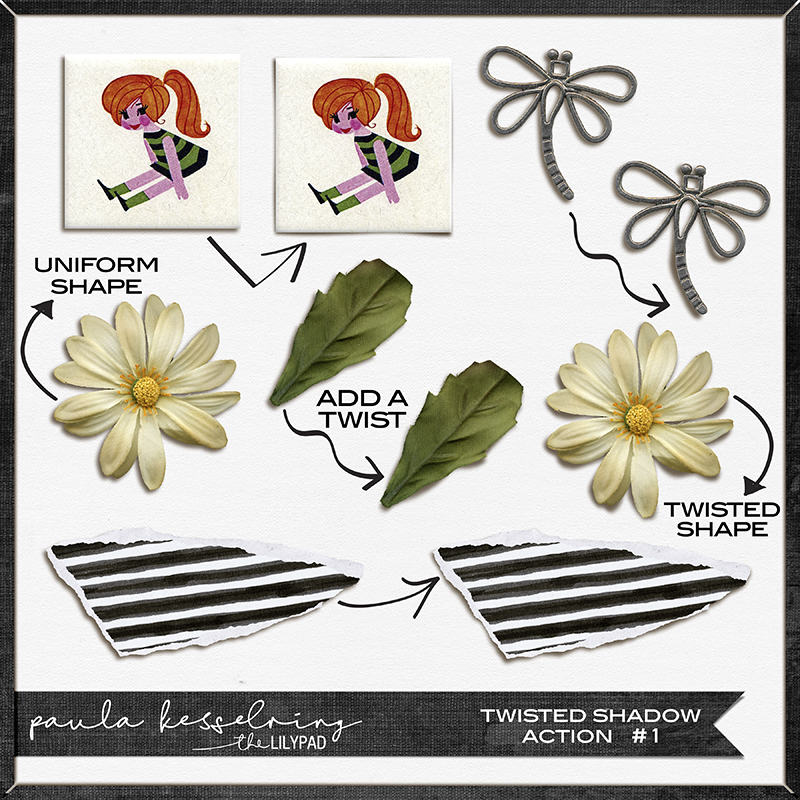
We know that in real life the shadows of objects are not perfectly flat and without
movement and to replicate this effect in the shadows of elements such as flowers,
crumpled paper, string and ribbons.
But using the new Twisted Shadows Action you can adjust your shadows
to make them much more realistic!
Here is a quick tutorial with some techniques to give you a more realistic shadows.
You can make design features stand out from the background with just a few clicks.
An object may contain two types of shadow, one of these is “cast shadow,” and another one is “form shadow.”
The term cast shadow is such a reflection that looks on the floor or a different thing typically around the main objective.
The term form shadow is such a reflection on an object that is opposite of the light source.
However, either the cast shadows or the form shadows can be determined by the following parameters.
- The direction of the light.
- The distance of the light from the object.
- The total number of light sources (present on the spot).
Let’s start:
First you will need to install the styles and the actions.
INSTALLING PS ACTIONS:
Installing Photoshop Actions is quick and easy, and best of yet, once you install an action, it will stay in Photoshop.
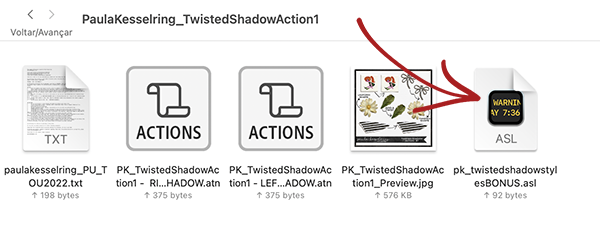
Download the zip file containing your actions and unpack the contents of the file. This will reveal a new folder containing a few other files, one of which is an .ATN file.
The quickest way to install your layer action is to just drag this .ATN file directly into your Photoshop window.

Or you can follow these steps:
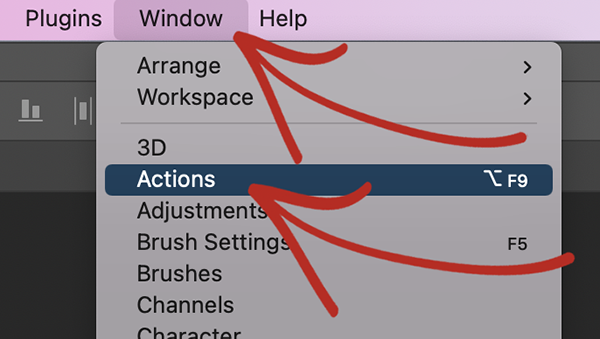
- Open the Window Menu in Photoshop. Choose Actions from the menu.
- Click the Menu Icon.
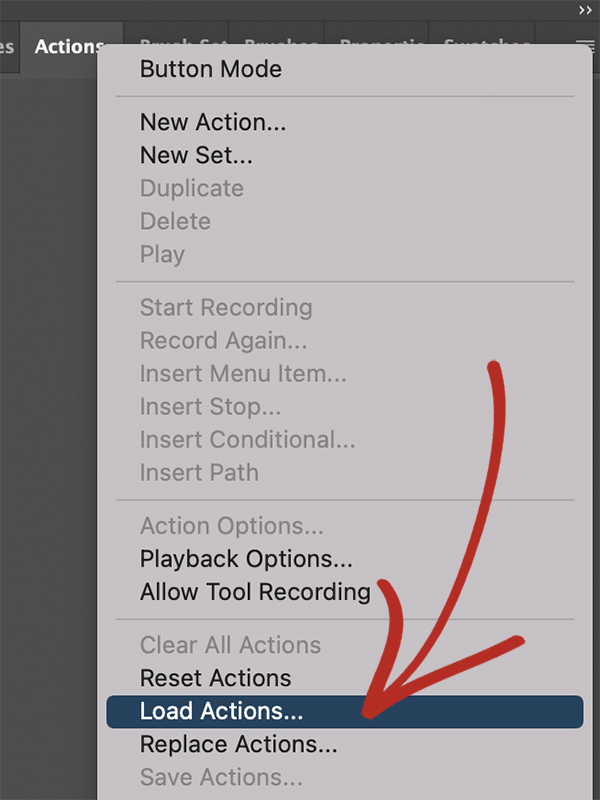
- Scroll Down to Load Actions
- Open the Photoshop Actions Folder
- Double-click the .ATN file.
- Click on an Action, Press the Play Button. Enjoy!
Or:
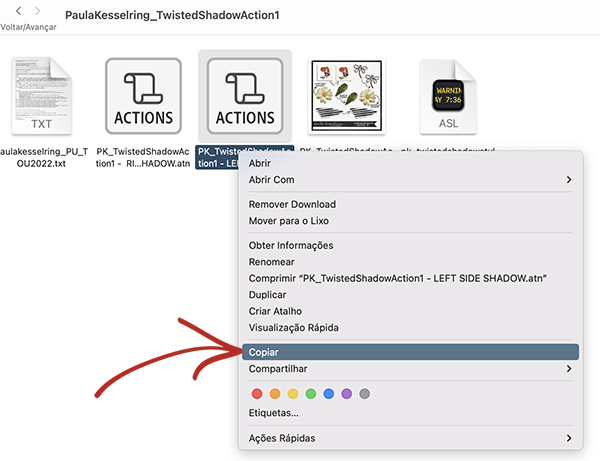
- Go to the folder that contains the actions file you want to install.
- Right click on it ( it’s the .ATN file) you want to install then right click and choose “Copy.”
- Open the Actions Palette on the right side of Photoshop, using the dropdown menu.
- Choose “Paste” from the pop up menu, and close the window.
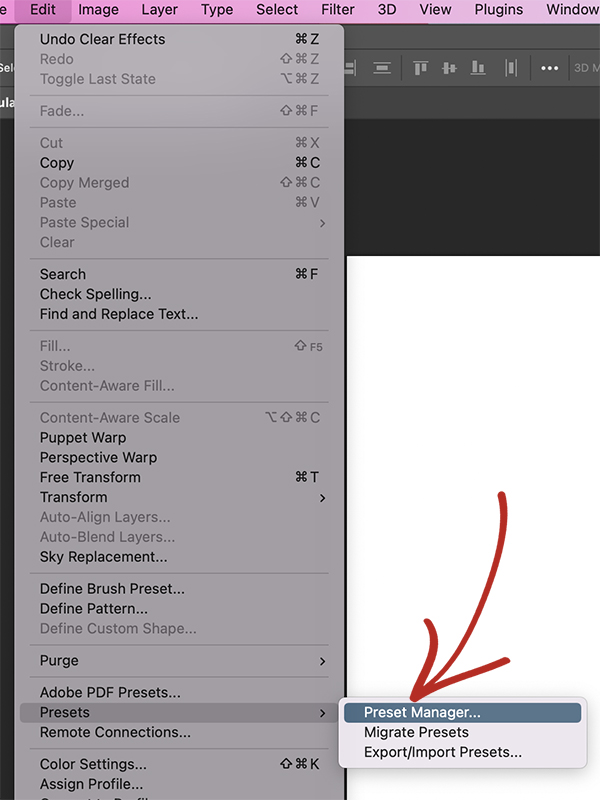
Or:
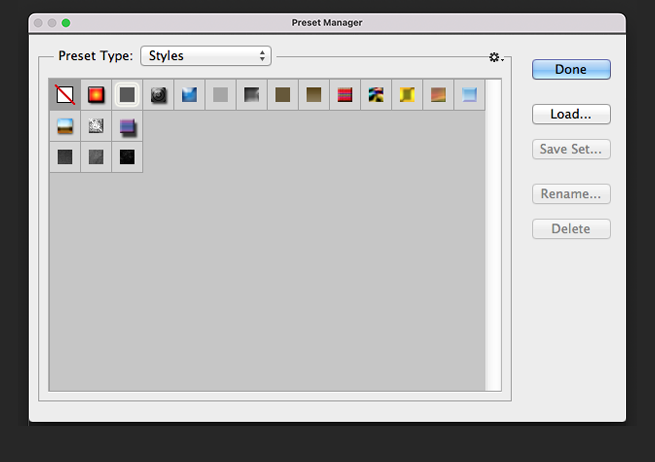
In your menu bar, go to Edit > Presets > Preset Manager, select Styles from the dropdown menu, and then add your styles using the “Load” button and selecting your .ATN file.
APPYING AN ACTION:
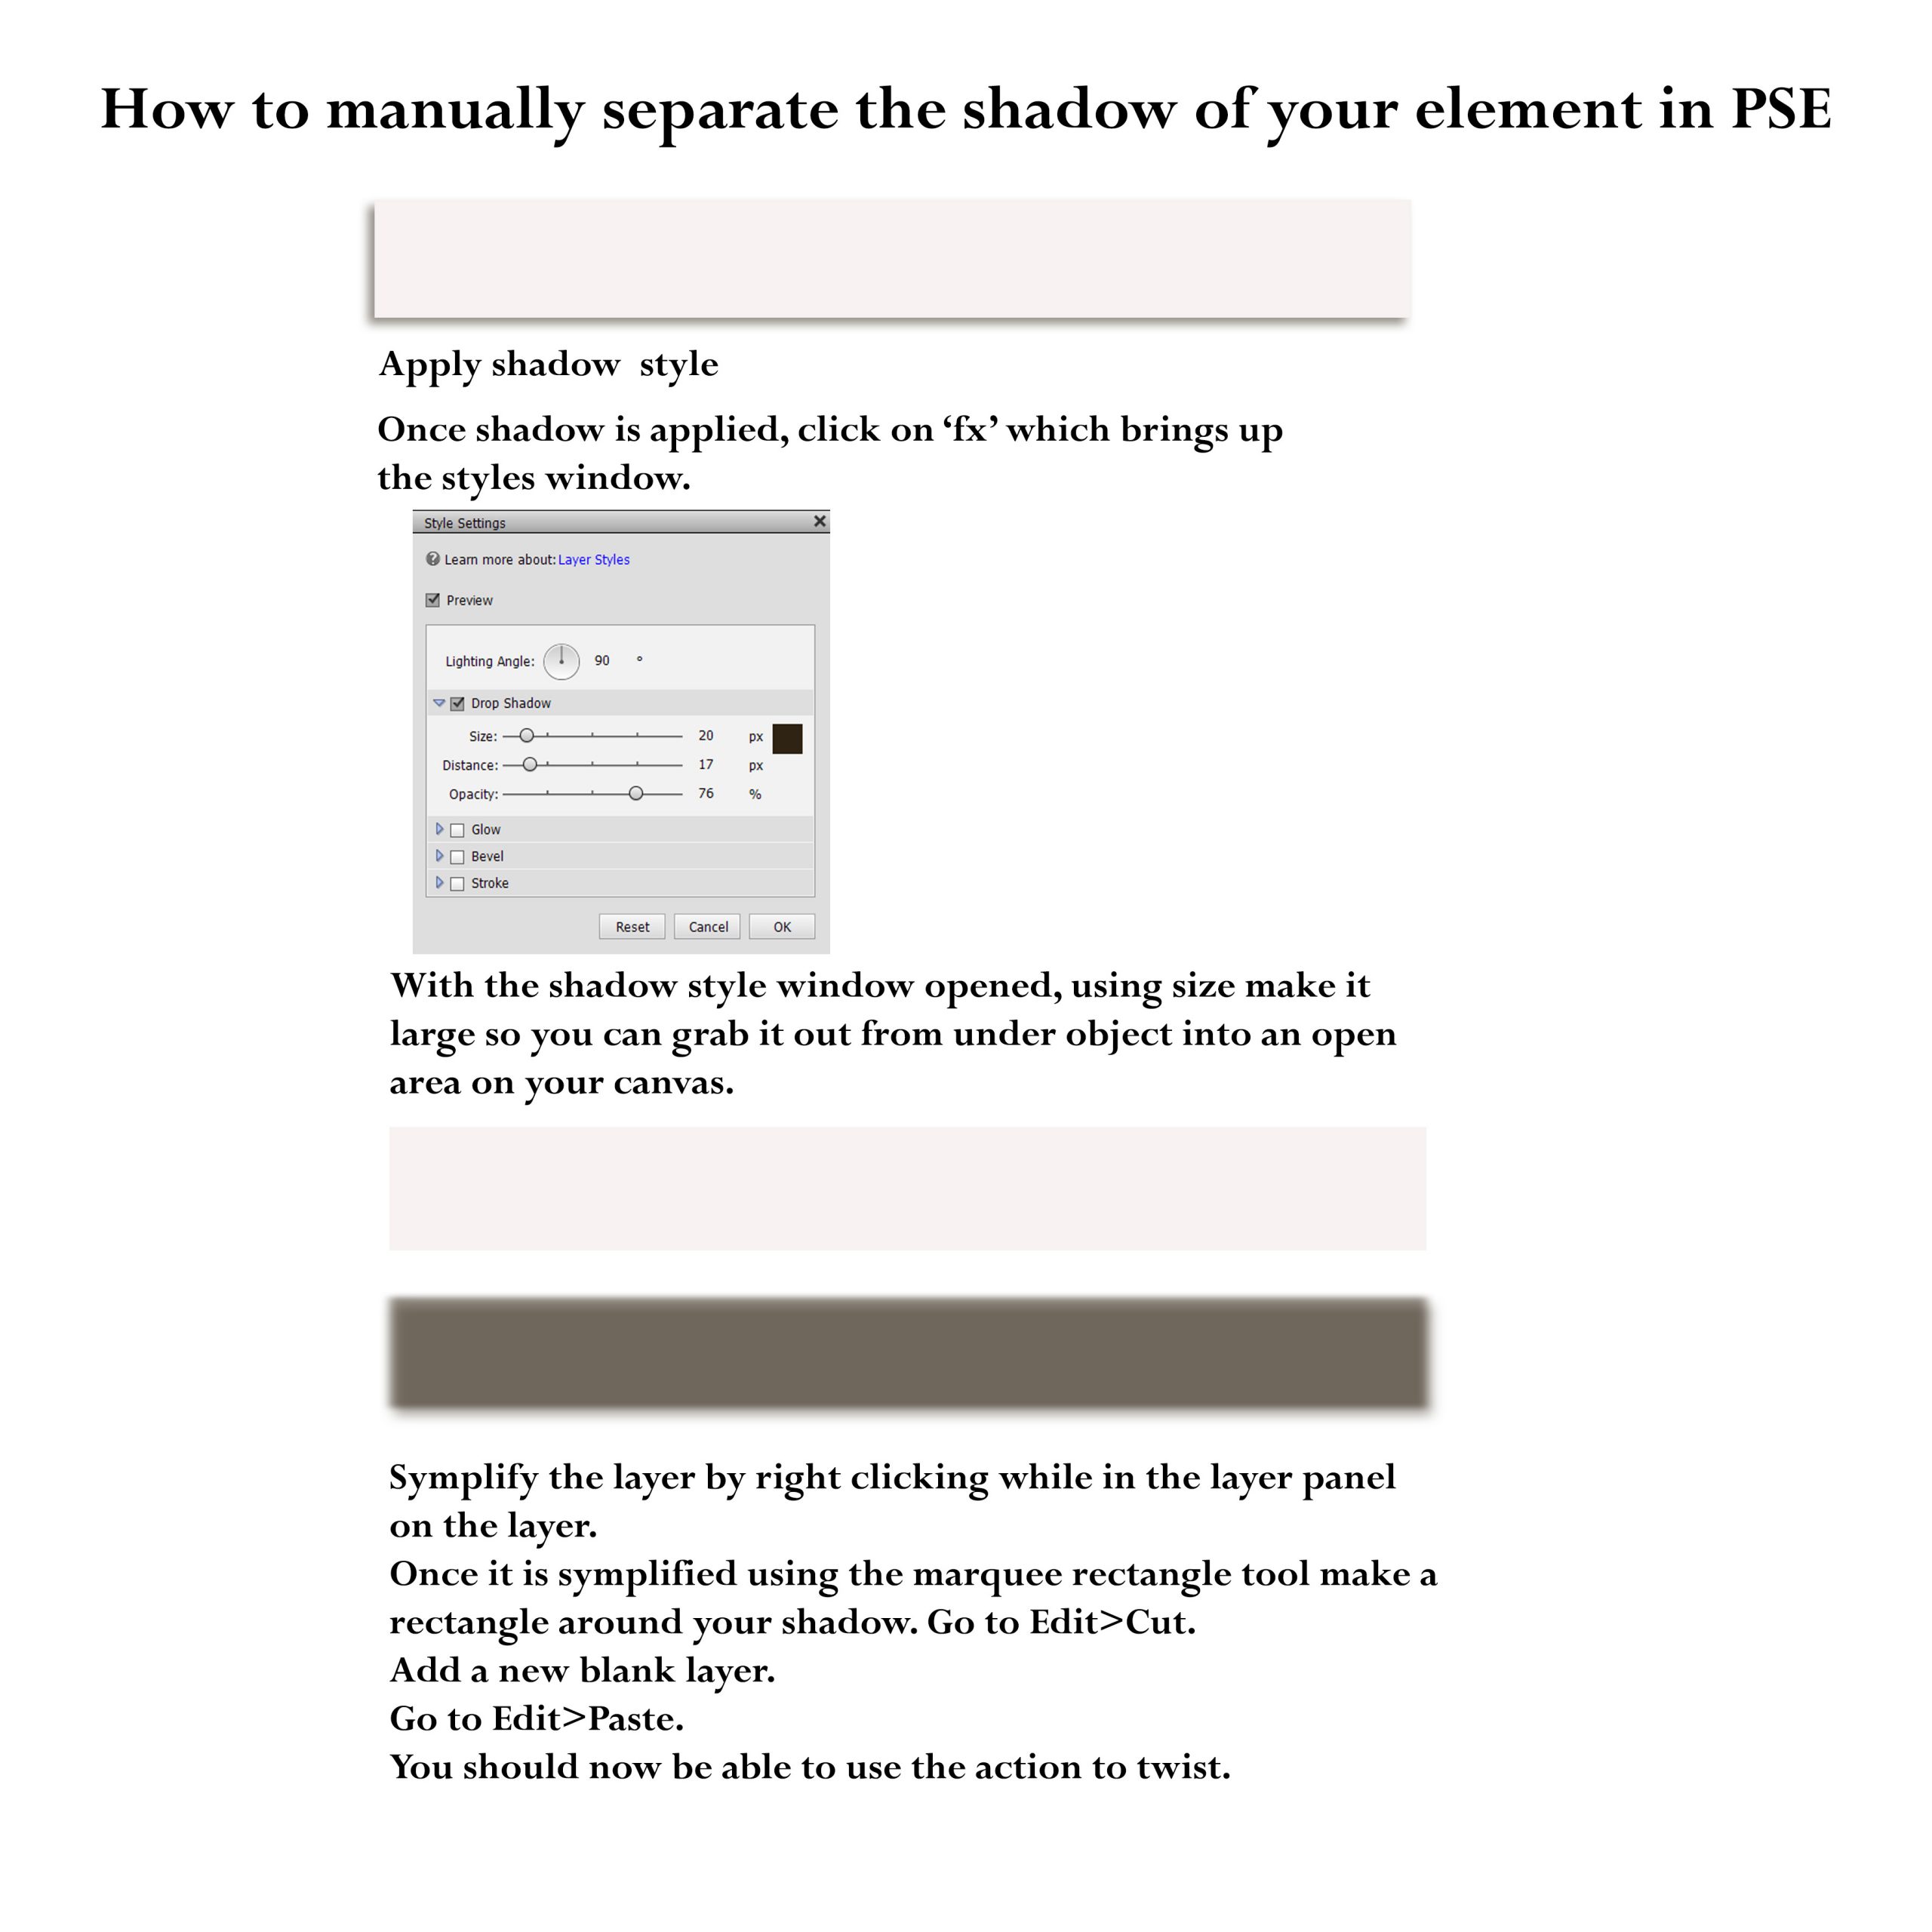
- Set of actions created in Photoshop CC version 23. 3.2 and tested in Photoshop CC, CS6 and CS5. It will be compatible with Photoshop Elements if you seperate the shadow – Look how to do this in the tutorial below.
- Note that the shadows will differ a little bit from one element to other, depending on their shape as well as their placement on the page.
- The final shadows are placed on their own layers, so you can change them even more using the wrap tool (You can go to Edit/transform/warp to bring up the warp box around your element – The shadow can be altered by left clicking any of the points on the warp box and pulling a point to stretch the shadow), changing the opacity, color, etc… You also can change the position of element or shadow on the page for different final results. You must play with it!
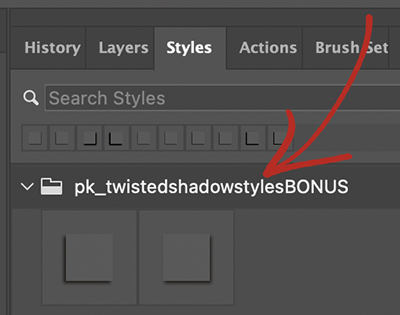
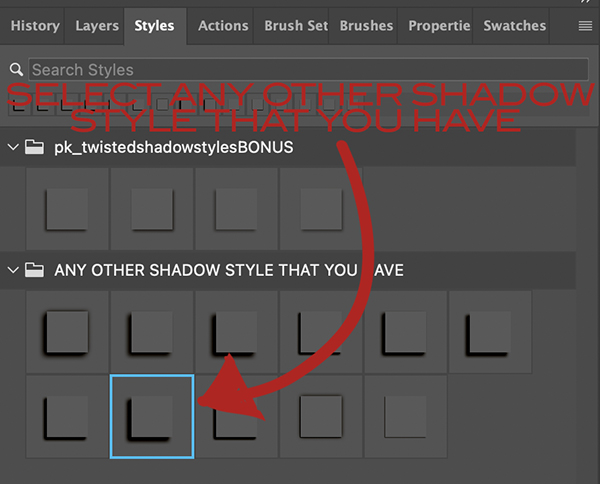
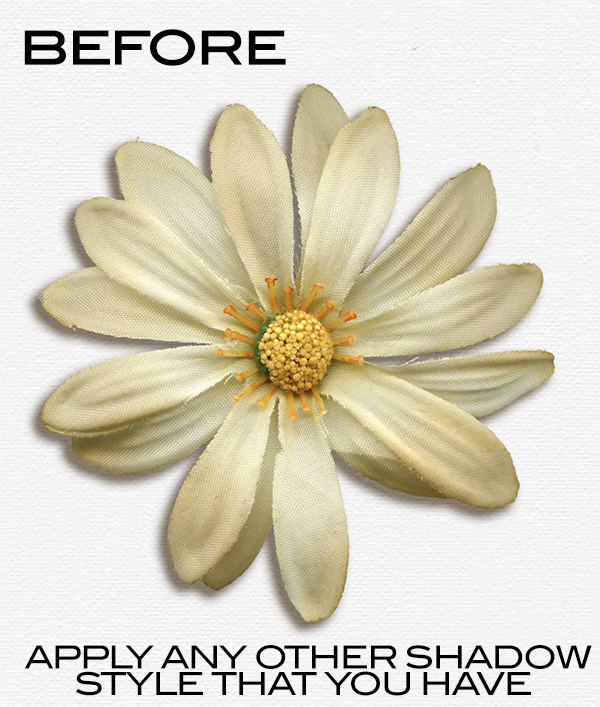
- The Shadow Styles Bonus is a gift. But this action runs with any shadow style that you already have! YOU ONLY HAVE TO ADD YOUR PREFERED STYLE AND WHEN RUN THE ACTION YOU WILL NEED TO SKIP THE ” apply style pk_shadowstyle…”. – you can see how in the third video below on YouTube.
It is only compatible with PSE if you can seperate the shadow. Seperating the shadow in PSE takes an extra 2 manual steps to move the shadow away from the object and then cutting the shadow and placing it on a seperate layer. I’ll show this below!
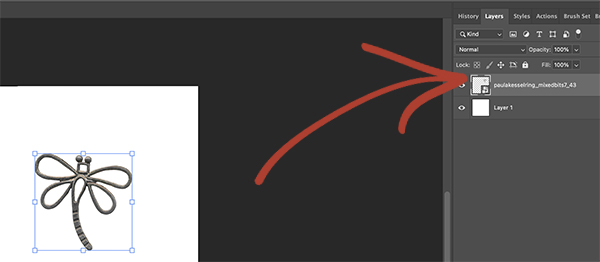
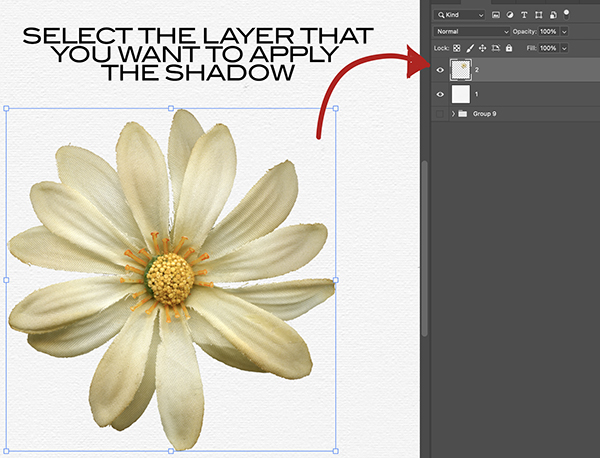
To apply an action, simply select the layer that you would like to modify to and then find the action you’d like to use in your Action’s Palette, then when you click the Action it will be immediately run and applied to your layer.
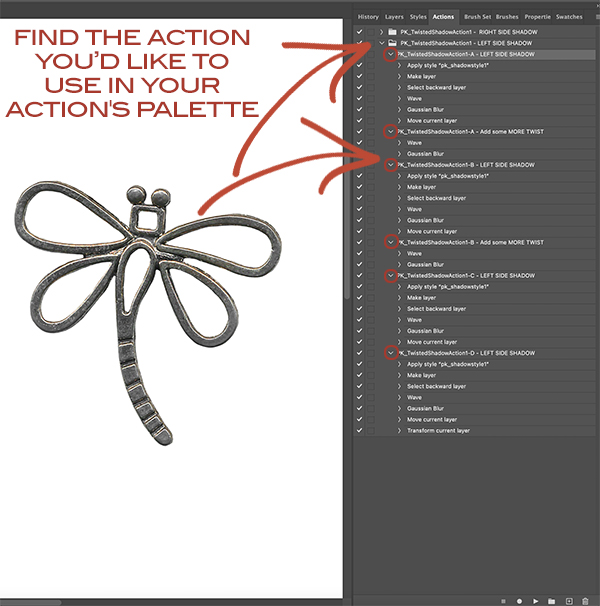
In Twisted Shadow Action you will find shadows for the left side and shadows for the right side in 4 versions: right and left sides in dark and light options.
And within each of these 7 different twist possibilities.
Choose the one that best applies to your object. Choose the layer where the object is and click run for the action to start running.
If you are not satisfied with the result you can still improve the shadow by clicking on the option “Add some MORE TWIST” or using the “wrap” tool as I teach below.

INSTALLING PS STYLES:
Download the zip file containing your styles and unpack the contents of the file. This will reveal a new folder containing a few other files, one of which is an .ASL file.
The quickest way to install your layer styles is to just drag this .ASL file directly into your Photoshop window.
Or you can follow these steps:
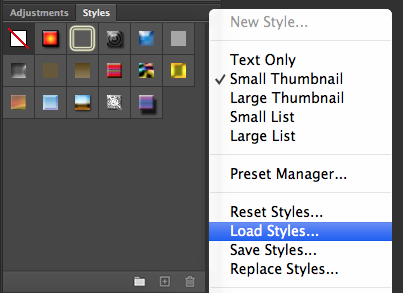
- Open the Window Menu in Photoshop. Choose Styles from the menu.
- Click the Menu Icon.
- Scroll Down to Load Styles
- Open the Photoshop Styles Folder
- Double-click the .ASL file.
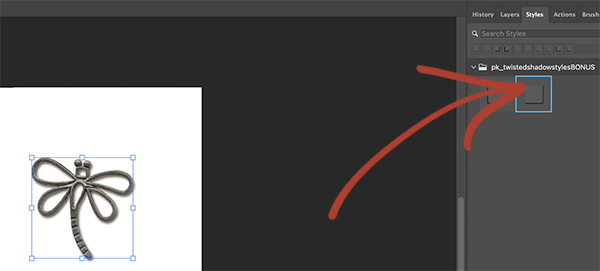
- Click once on a style to add its effects to the currently selected layer.
Or:
- Go to the folder that contains the Styles file you want to install.
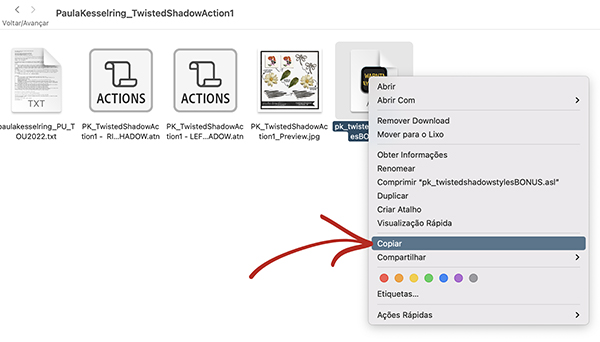
- Right click on it ( it’s the .ASL file) you want to install then right click and choose “Copy.”
- Open the Styles Palette on the right side of Photoshop, using the dropdown menu.
- Choose “Paste” from the pop up menu, and close the window.
Or:
In your menu bar, go to Edit > Presets > Preset Manager, select Styles from the dropdown menu, and then add your styles using the “Load” button and selecting your .ASL file.
APPLYING A STYLE:
To apply a layer style, simply select the layer that you would like to modify to and then find the style you’d like to use in your Style Palette, then when you click the style it will be immediately applied to your layer.
Important : You cannot apply an action to a background layer or to one that is locked. before start check to make sure the layer is not locked and the object layer is selected.
USING THE “WARP TOOL”:
This tool allows for any part of a picture to be carefully distorted or molded into a unique shape, because in real life shadows sometimes run deeper in some areas and thinner in others.
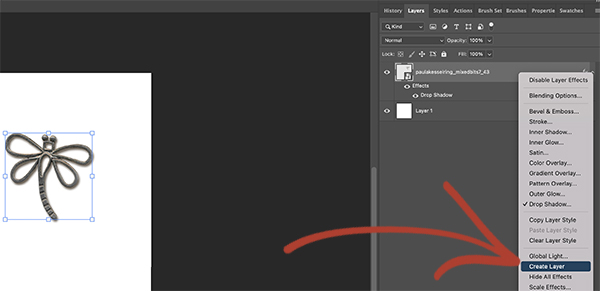
First select the image layer that you want to play, add a shadow style of your choice, then right click on “fx”, when you do that, a fly out box will appear and you will want to select “Create layer.”
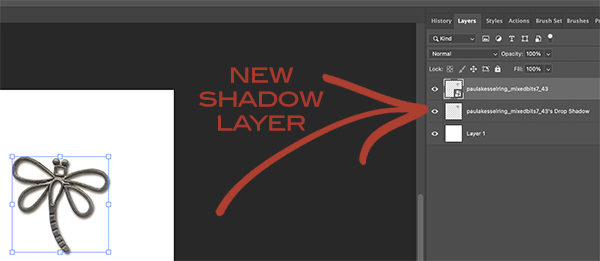
In the Twisted Shadow Action shadows are placed on their own layers. So you don’t need to do this step above.
You will have 2 layers – One with the element and other with the shadow.
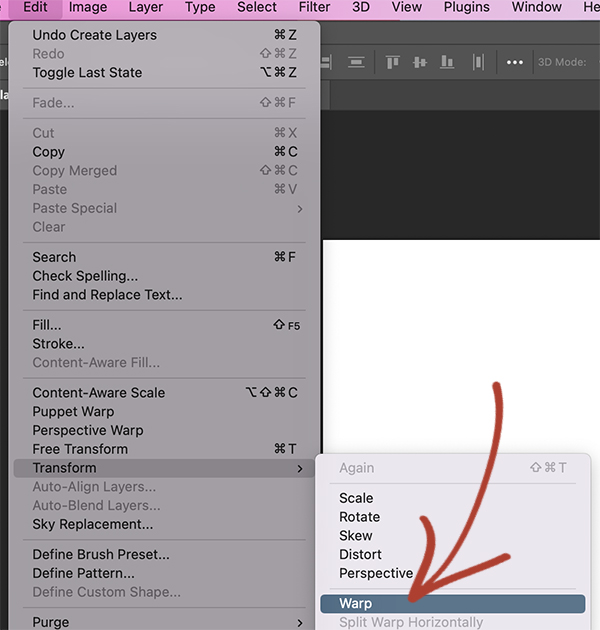
To warp in Photoshop, you’ll want to access the Photoshop warp function by clicking on “Edit” at the top and then select “Transform.” You’ll then choose “Warp,” and a grid will appear over the selected part of your image or the entire image. You can then click and drag to warp the image or use the point at each corner to create a more dramatic warp.
To accept a warp, click on the checkmark located on the options bar. To cancel the warp, you can also click on the cancel button.
USING THE PHOTOSHOP ELEMENTS:
Here is a tutorial about how to manually separate a shadow in PSE and then the actions would work. Because it is only compatible with PSE if you seperate the shadow.
Seperating the shadow in PSE takes a few extra manual steps to move the shadow away from the object and then cutting the shadow and placing it on a separate layer.
Whatch the video below to learn how to use this Action on YouTube.
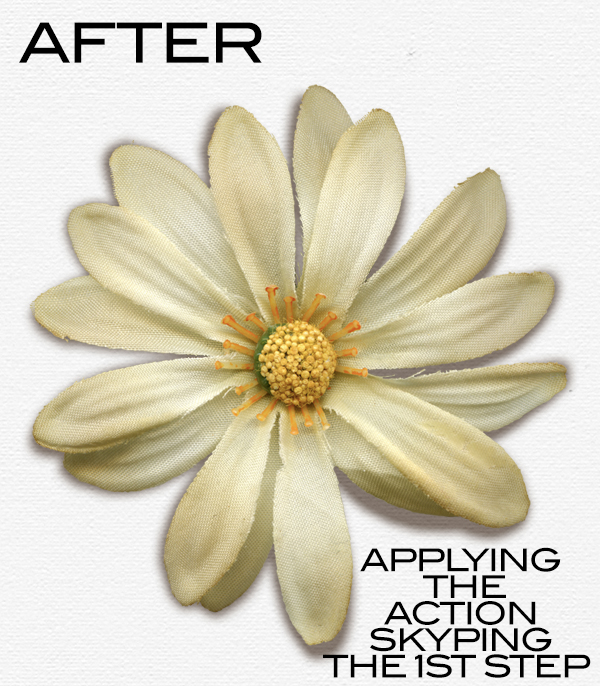
APPLYING THE TWISTED SHADOW ACTIONS USING YOUR FAVORITE SHADOW STYLE:
You don’t need to use the Bonus Twisted Shadow Style that comes with the actions. You can use ny styles that you already have and like.
First you need to chose the element layer that you want to play.
Then apply the shadow style of your choice.
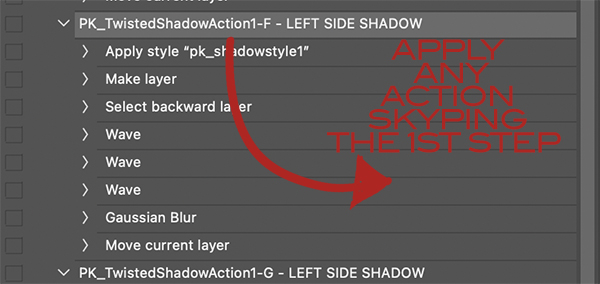
Then open the action pallet and choose the action of your choice to run.
Before running play you must skip the first step.
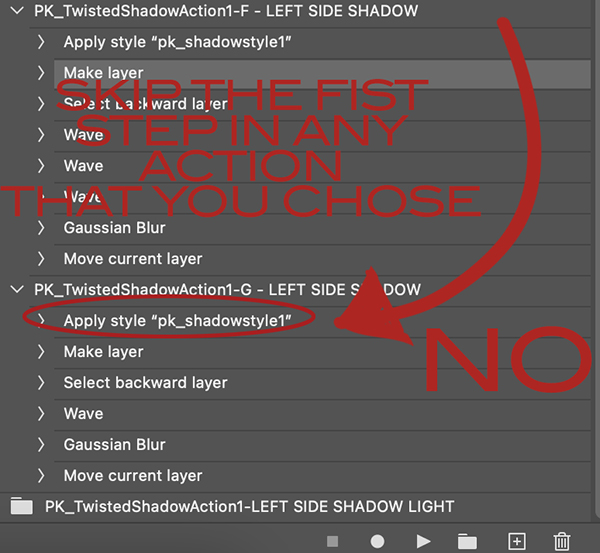
Starting selecting the second step and click on the PLAY button.

And voilà!
Whatch the video below to learn how to use your own shadow styles with this Action on YouTube.
If you’d like to have realistic shadows,
feel free to check out “TWISTED SHADOW ACTIONS” in my shop.

I love this action! So fast and easy! I just used it on 10 layers at once (creating a cluster) and it worked beautifully.